![]()
Introduction:
Carl Chetta owns and operates Mid-Island
Appliance in Central Islip NY. I was looking for some used
washing machine solenoids and called his store. The rest is
history, when he found out I was interested in building stuff for
Halloween, he got very excited. I met him and we became friends right away.
When I told him I was going to run air through the solenoids he became
very interested. He always had a display of used washing machines in
front of his store for Halloween but had been using water to activate
his special effects. Within a couple of days he came up with
"Trash Can Trauma".
Effect:
What appears to be a normal looking 45 gallon
trash pail suddenly comes alive. It seems as if someone has
been hiding in the pail! The lid rises rapidly to show a hideous
mask while an arm comes shooting out at you. All this with the possibility
of sounds and lights. This is guaranteed to scare the daylights
out of any unsuspecting victim.
Press here to see a picture (Trauma1.jpg) that Doug Ferguson is putting in his book "Phantasmechanics" (copyrighted) due for publication in 1997 showing the stages of operation of the effect.
How it works:
2x4's are cut and screwed vertically into the
middle of each side of the trash can. A support shelf is built
between the 2 boards to support a bicycle tire pump so that the
handle of the pump is right under the lid when the lid is on the
can. If you get the parts described below, the handle will press firmly into
the bottom of the lid. The handle is then secured to the lid with
screws. When air is applied to the pump discharge side, up goes
the handle carrying the lid or anything else with it.
The arm:
The arm is a piece of 1 1/2 inch PVC pipe that has a 1/2 inch hole drilled through one end. A long 1/2 inch bolt will serve as the attachment point of the arm.
About 3 inches from the attachment point, the fulcrum is attached. A 1/2 inch hole is drilled into a 2x4 and the bolt with the PVC is placed into the 2x4. The bolt does not have to be secured in any way. The arm is crossways across the front of the trash can and placed so that when air is applied it will extend out of the trash can. Remove the adjusting screw from the bottom of the screen door cylinder. Screw in some kind of connector and attach a piece of washing machine hose to it. I used 1/4 brass ell's and tee's. Applying air will force the cylinder out, and a spring will retract it when air is taken off.
Once the arm is set up, you can attach the
cylinder to another piece of 2x4 and secure it with clamps. This
will take a little adjusting.
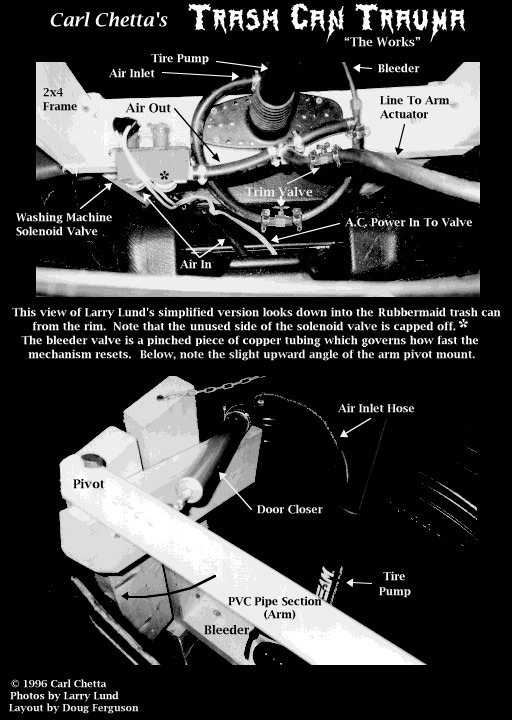
Press here to see a picture (Trauma2.jpg) that shows the inner workings of the effect.
Controlling it:
I use a remote control power switch from radio shack.
Part number 61-2667 it costs $22.99. Some tips: You must remove the air line exiting the
bicycle pump, there is a check valve that has to be removed to
allow the air to go in the opposite direction. You have to
install a bleeder valve somewhere to allow the air to escape and
the effect to be automatically reset. I used a brass Tee with a
nut, ferrule and small piece of tubing that I could crimp. You also have to be very careful not to use too
much air pressure or you will blow the top of the bicycle pump
off. I attached old window sash chains to the pump handle and
secured the chain to the 2x4's on the sides, limiting the throw
to just short of full. To adjust the cylinders so that they
operate good together, shut off both air metering valves (see
parts description below) and then crack open the valve leading to
the bicycle pump. When that is operating OK, crack open the valve
leading to the screen door cylinder. If everything is set up OK, the lid will rise
just before the arm comes out and when the air is taken away, the
spring return in the screen door closure will snap it back in as
the lid slowly descends from it's own weight and is reset. You can now dress up the apparition, putting a
sleeve and rubber hand on the PVC pipe. A couple of blocks of 2x4
with a hole for the pump rod can be used to secure the mask to
the trash can lid. I also use a bicycle air horn (rubber bulb removed) attached
to my air supply which works well to create some sound. If you have trouble with the lid twisting and not resetting
properly, get 2 pieces of PVC plastic pipe where 1 piece will fit easily into the
other. I recommend 1 inch and 1/2 (1 1/4 and 3/4 work fine too)
inch ID. put a cap on the smaller of the 2 pieces and
attach the larger piece vertically to the rear of the trash can. (drilling small holes
into the rear of the trash can to accept electricians tie wraps will work.) This will serve as a
sleeve for the smaller piece which will go inside of it. Secure the smaller pipe to the lid
of the trash can with a screw through the lid into the cap of the smaller pipe.
This arrangement will enable the lid to return to it's closed position properly. Flow of air: The air should flow from the source to the
washing machine solenoid through the relief valve to a tee with
each side of the tee going to separate air metering valves. One
side goes to the bicycle pump and the other to the screen door
cylinder. Material list: Warning! Be very careful when
applying air to this device, some holes were blown in ceilings
and pumps blown apart. The device will operate with 25-35 lbs of air
pressure. Maybe less.
Back to Larry Lund's Home Page Last Modified on: January 2023
It consists of a remote on/off control
you can put in your pocket. Just like the remote control used for car alarms. This
controls a receiver that you plug the washing machine solenoid wire into.
I just hit the on, followed immediately by the off to trigger the device.
I have a lot of effects that I have to turn on/off (5 right now) and I
decided I had to do them all remotely. I picked up a Stanley remote control
system from home depot. It consists of a wireless hand held remote with 8
on/off buttons and a base unit that plugs into any wall outlet ($39.95).
The base unit has an antenna that receives signals from the remote and
transmits them through your house wiring to any lamp or appliance module
you have plugged in (Lamp module $9.95 appliance module $12.95). The
modules are addressable.
Anything plugged into the modules can be
controlled by the remote.
Here is the hooker.
My house has two 110 volt
lines coming into the circuit breaker box. If a module is not on the same
phase (110 side) as the base unit it doesn't work!
A call to Stanley was
made, and they told me I had to purchase a Leviton signal bridge to bridge
the 110 volt lines.
They don't sell them.
I found one at my local electrical supply house
($42.50). I took it home and read the directions and found out I must
install 2 15 amp dedicated circuit breakers (each $7.50) in my box to install the
signal bridge. I wired it in myself and it really works fine.
The
problem I have is that Stanley had nothing in their directions to indicate
that you might have this problem. As you can see, this really increases the expense.
![]()
Ascii diagram:

T=TEE
A=Air metering Valve
R=Relief Valve
Air in=Air in refers to your compressed air source, a compressor or an air tank.
                                      To screen door cylinder >
110VAC                   /======A===============================
Solenoid---\             |
           |             |
           |             |
           V             |
Air in >|===O            |                       To tire pump >
========|=========R=====T========A=============================
        |===O
![]()
Rubbermaid 45 gallon trash
can model 208L or 170L
Home Depot
Wall-Mart $23.00
$19.99
Techteam Advanced uni-body composite
bicycle tire pump 120 PSI max
Toys-R-Us
$ 9.90
Screen door hydraulic
cylinder
Home Depot
$ 6.00
2 2x4 8'
Your pick
$ 3.00
2 feet of 1 1/2in PVC pipe
for the arm
Your pick
Ugly mask
Your pick
Fake hand.
Your pick
Clothes washing machine solenoid
valve (hot/cold)
Washing Machine repair place.
$ 2.00
Cap for one side of valve.
Garden supply
$ 1.00
120VAC line cord to
connect to the washing machine valve.
Scrounge it
Washing machine hose for
all the air lines. Cut and clamp all fittings
Scrounge it
2 in-line air metering
valves (like the ones used on spray guns to regulate the air
pressure) I found Home Depot had 1/4 CXC needle valves ($
3.97ea.) which turned out to be perfect and cheap. SKU
#048643070509
You don't need the nuts and ferrule's Your pick
$??.00
Miscellaneous fittings and
clamps. I found that 1/4 inch brass fittings worked real
good, I was able to force an elbow into the pump base
after the air line was taken off. It threaded itself
right into the plastic. I did the same with the screen door
closure.
![]()
![]()
![]()
![]()